With some exciting projects in the pipeline here at Bluecadet, we’ve been looking into new ways to display engaging content beyond run-of-the mill pixels and projectors. Having these specific visuals and projects in mind as well as general interest in emerging technologies, we decided to spend some R&D time looking into 3D displays and how to use them successfully.
As with any display technology, it helps to look carefully at what its capabilities are in order to make sure it’s successful. Our goal was to test three different displays and come up with some best-use-case scenarios and a few design principles for visualizing the most impactful content. The four displays discussed below are Looking Glass Factory’s (LGF) 8K and Portrait offerings, the Magnetic 3D 50″ Wildfire Pro and the Sony Spatial Reality Display, referred to as “8K”, “Portrait,” and “SRD” respectively.
Whenever possible, videos are presented below in full resolution and frame rates so the displays can be fully appreciated and evaluated. Obviously, the full 3D effect can’t be fully appreciated with a single camera lens, but these should give a rough sense of parallax, visual artifacts, etc.
Special thanks to all the vendors listed here. Sony and LGF generously sent us test units (some of which were in early prototyping phase), and Magnetic 3D organized a safe in-person review and walkthrough.
Tech Overview
The displays below accomplish a 3D effect through 2 different methods, each of which have specific design constraints and caveats for use.
Light Field Displays
The LGF and Magnetic 3D displays make use of a sophisticated lenticular film on the screen surface that channels not only slightly different images into each eye (i.e. a “stereo-pair”), but also a different set of images based on where you are located with respect to the screen.
Light Field Created by Lenticular Display (Image Credit: Looking Glass Factory)
In order to drive these screens, content must be sent to them with all possible views of the 3D subject stitched together into a “quilt.” The internal processor of the screen receives the quilt image and arranges the thin slices of pixels to work with the micro lens to achieve the 3D effect. As seen below, LGF displays require a 45 image quilt to achieve a smooth, high-fidelity parallax effect. By contrast, Magnetic 3D displays are capable of running a single 2D image (for use as a regular display), a double image stereo pair, and 9 image quilt.
It is important to note that this technology does not allow for vertical parallax, meaning the stereoscopic effect is only created along the horizontal axis, from left to right. And while the 3D effect is certainly perceivable while standing still, it is much more effective when the user can move and truly appreciate the parallax.
Due to the nature of the technology, some subtle visual artifacts will always be present and are important to keep in mind:
Moving between stereo-pairs (i.e. the images of the left and right eye get momentarily switched) a subtle “cross-eyed” effect may be noticeable. This is less apparent on displays that have more images in their quilt as there are more image pairs available with less horizontal distance between them.
As the maximum viewing angle allowed by the micro lenses is reached, the image will “fail,” giving conflicting visual information.
Within the 3D scene being visualized, content positioned too close or too far from the viewer may cause image ghosting. This results in a “sweet spot” for content somewhere in the middle that gives the best parallax effect while reducing artifacts.
The greatest advantage of this technology is that it provides a multi-user, “glasses-free” approach, allowing multiple people to enjoy the content with no additional equipment (i.e. barrier for entry).
Eye/Facial Tracking Displays
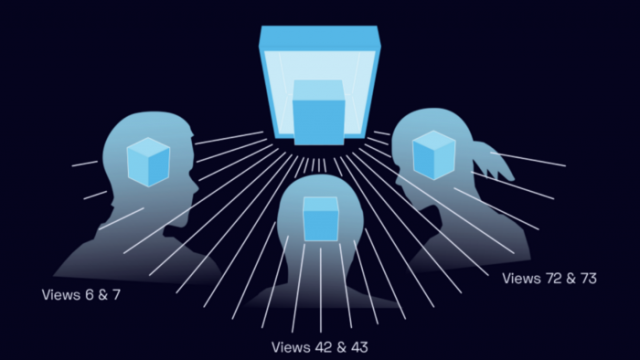
Facial tracking displays like Sony’s SRD take advantage of the micro lenses mentioned above in addition to a facial tracking camera embedded within the display’s housing. This allows the display to track the position of the user in space and show a view of the 3D subject that would correspond to where they are with respect to the screen. This allows for both horizontal and vertical parallax, giving users more freedom to examine the subject from various angles.
The biggest limitation of this methodology is that it is truly a single user display. Any other viewers in the space aside from the primary, facially tracked user will see a warped perspective designed solely for the first user. A similar problem exists if there are no users present: the display doesn’t know what perspective to show. In this case, it is important to leverage the facial tracking data (or lack thereof) and have the screen fall back to a 2D image to attract users as opposed to a visually distorted image. Sony’s SRD SDK does this automatically.
Naturally, these types of displays will also suffer from the shortcomings of facial tracking technology in general. Masks and other types of facial coverings, whether pandemic or culturally related, will limit tracking ability. Darker skin tones are also a known failure point for many facial tracking toolkits so it is important to thoroughly test lighting conditions, device positions, and other factors to maximize accessibility for all users.
Designing For 3D Displays
With any of the displays below, one thing is exceedingly clear: they are NOT regular screens. The content intended to be shown MUST be carefully curated and designed to maximize the 3D effect. Below are some principles and suggestions we noted to make 3D visuals more successful.
Solitary “hero” objects work best as they provide the largest contrast between the foreground object and the empty space they exist in. Seeing a scene that extends across the whole display and gets cut off at the boundary slightly ruins the illusion. Note the difference between the LGF 8K Squid video versus the LGF rabbit scene below.
Construct the overall scene to give the viewer as many visual hints for depth as possible. Things like lighting, movement, and background selection give the brain additional cues that cause us to perceive depth. A high contrast object on a flat background, artificially scaling an object up as it moves toward the user in 3D space, and backgrounds that provide perspective or a horizon line will amplify perceived depth.
Magnetic 3D display taking advantage of the background and lighting to amplify the feeling of depth.
Tailor the content to the spatial setting and use case. Insetting the display within cabinetry or setting it just beyond reach will prevent users from getting too close and ruining the illusion. Using large hero objects/3D text with dramatic depth transitions call attention from a distance while using subtle parallax effects to augment closer viewing.
Be careful with text use. Each display’s own SDK provides ways of rendering text for maximum readability but image artifacts can cause text to be difficult to read or even disorienting if not used carefully.
All the displays reviewed have some type of lenticular coating making them highly susceptible to damage from touching, scratching, and finger oils. Protective glass is necessary in publicly viewable use cases.
In light field displays, be wary of visualizations requiring lots of small objects like particle systems or point clouds. The small dots partnered with visual artifacts from the lenticular displays can create unflattering moire patterns and visual confusion.
Looking Glass Factory Displays
Looking Glass 8K
Upon first view, the 8K display is a substantial piece of equipment. It is very solidly constructed with a thick pane of optical glass and a solid aluminum chassis. Make sure you get a spotter when moving it around and have proper support for any mounting scenario! In addition to substantial hardware, there are a substantial number of pixels. 8K worth of pixels is a lot to drive in addition to the overhead of rendering 3D content in 45 different views required by LGF. Make sure your computer is equipped with a capable graphics card with 2 display port connections along with a USB 3.0 connection to control the display. While LGF recommends a Nvidia RTX 2080, we tested the 8K successfully on a GTX 1080 Ti.
Video of Looking Glass Factory 8K Display
Looking Glass 8K Screen Point Cloud
Looking Glass Factory 8K Squid
Looking Glass Factory 8K Text Example
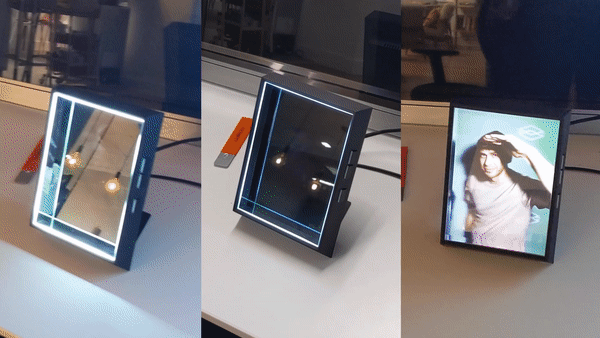
Looking Glass Portrait
The portrait display is quite small and lightweight, lacking the thick glass of its larger siblings. At the time of review, the portrait was still in development and included pre-baked content which did not require a PC to run, only a USB cable to power the internal Raspberry Pi 4.
Looking Glass Factory Portrait Balloons Example
Looking Glass Factory Portrait Squid Example
Looking Glass Factory Portrait Face Example
Looking Glass Factory Astronaut Example
Notes
Optimum viewing distance was roughly 6-12 feet, but viewing up close was not bad. From far away, many visual artifacts disappear.
The image on the 8K is surprisingly crisp considering that the many pixels are split up by the 45 image quilt (equivalent to a roughly 1145 x 644 pixel image).
45 discrete views within the quilt makes visual artifacts between stereo-pairs very subtle and is overall a pretty seamless experience while moving around.
The measured horizontal viewing angle is about 50 degrees total, meaning about 25 degrees off-center until the image “fails.” At the maximum viewing angle the 8K will give a conflicting stereo-pair causing a nonsensical image, while the Portrait contains a privacy filter that causes the image to darken at extreme angles before the “fail” point.
The thick glass on the 8K display is beautiful and eye catching, however it will produce a bit of glare so the location of the display with respect to ambient lighting should be planned carefully.
The Portrait lacks the glass and because of this it looks like you’re peering into a portal.
LGF requires an OS level service called HoloPlay (available for Windows and OSX) and has plugins for Unity, Unreal, Maya, Blender, DepthKit and more.
Visualizing text or other flat imagery needs to be done thoughtfully and positioned carefully within the 3D scene on the convergence plane (see “LGF Text” video below).
For debugging/development, the 8K screen must be attached as a secondary, extended display but micro lens prevents the desktop from being readable so it is not quite usable as a monitor during debugging/setup. We did not test using the LGF as a stand-alone display.
LGF supports display tiling relatively easily within the SDK in order to build a video wall. However, all displays have a fairly large bezel that should be factored into the video wall design. For the Portrait display, the privacy filter should be taken into account when tiling as the image may go dark when viewing several side by side.
Magnetic 3D Display
Magnetic 3D has a wide array of offerings, with screens of all sizes and are available to work out custom solutions from small displays to large 100″ screens and tiled video walls. We were able to view the 50″ Wildfire Pro display and sample content with a Magnetic 3D representative, but were not able to drive the display with our own content.
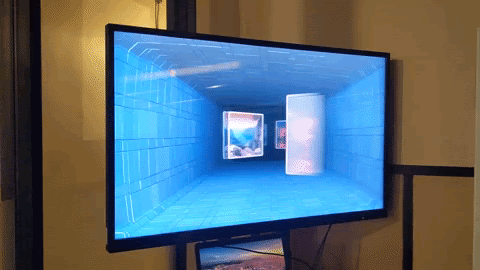
Magnetic 3D Display Tunnel Example
Magnetic3D Display Slideshow Example
Magnetic 3D Display Particles Example
Notes
The 50″ Wildfire is a 4K display that utilizes a 9 tile quilt, meaning each image is roughly 1,280 x 720 pixels.
Fewer images in quilt mean more discrete “steps” as you move between stereo-pairs from left to right and slightly more noticeable “cross-eyed” artifacts when between stereo-pairs.
Screen is very flexible and has settings via remote control to switch between a single image, double image, and 9 tile quilt. This is very helpful when switching back and forth between computer desktop and 3D content or when lower fidelity is needed for performance considerations.
M3D officially supports the display with a Unity SDK, but the display could potentially work with other platforms provided they output the same 9 perspective views.
Since custom displays are not uncommon for the company, lower bezel displays can be leveraged to make video walls or embed displays into exhibit/installation cabinetry.
Perceived depth of display feels a bit deeper than LGF displays by a small margin, about 12-18,” with the sweet spot of the visualization being 8-10″.
Sony Spatial Reality Display
In a different category from the previous displays, the Sony SRD is a facial tracking display and contains a camera embedded on top of a 15.6″ 4K display. The screen and camera are set within a prism shaped metal housing and includes two triangular pieces that attach via magnets that help frame the content and enhance the illusion of depth. The display requires a PC with a simple HDMI port and USB connection for the camera, and as expected requires a strong GPU capable of real time 3D rendering of 4K content.
Sony Spatial Reality Display Cube Example
Sony Spatial Reality Display Textbox Example
Sony Spatial Reality Display Shiny Cube Example
Sony Spatial Reality Display Draggable Example
Notes
The 3D effect is superb, allowing users to feel a very real parallax as they move around the object both horizontally and vertically.
Unity SDK is available and contains examples for displaying content and getting facial tracking data.
Facial tracking feels fast and responsive with very little lag or visual artifacts as you move around the display.
The SRD is set to “fail” gracefully back to a 2D image if no users are found. If multiple users are visible, it will persistently track the first user to step into frame.
Consistently takes less than 1 second to find face and adjust the perspective when going from obscured to unobscured face.
Facial tracking is possible on faces wearing masks but not great. It depends on lighting, face angle, etc. The author has medium-to-light brown skin and found the tracking to be on par or better than most open source facial tracking toolkits. However, the testing the display in a dark room definitely deteriorated the tracking quality so be sure to test in different lighting conditions.
Screen is shiny and glare prone, but the facial tracking is highly dependent on ambient lighting to find users.
Provides the most “real” hologram experience of all displays seen. Items truly feel touchable.
Viewing angle of the display is very wide, however facial tracking may fail at very wide viewing angles. It has the widest viewing angle of any 3D display seen.
Biggest pitfall: It is truly a single user experience. Seeing someone else use the screen feels very strange. If a camera happens to lose its primary user, it may quickly latch on to another user standing far away, which feels very alienating for the first user.
Wrap Up
All in all, we’re excited to find opportunities to use these displays in the right setting. Together with the right designs, they can be highly eye-catching and impactful without feeling tacky or gimmicky.
Lastly, I’d like to give a special thanks Looking Glass Factory, Magnetic 3D and Sony for giving us the opportunity to access and evaluate their displays as they graciously sent us test units, arranged (safe) in-person reviews, and talked us through using their products.
Disclaimer: Bluecadet was not compensated in any way for this review by the aforementioned partners but we do appreciate their openness and the time they spent informing us of their offerings.